Office 365 Migration Preparation Checklist:
- Remove Inactive Users
- Cleanup invalid directory data
- Align UserPrincipalNames (UPNs)
- Register a Managed Domain Name in Office 365
- Configure DNS
- Install Directory Synchronization
- Verify Exchange Certificates
- Configure and Test Exchange Hybrid Mode
- Configure and Test the Exchange Migration End-point
- Install & Configure Office365Migrator
Remove Inactive Users
Office 365 Migration Preparation can be simplified by finding and removing obsolete accounts will reduce the number of objects you will synchronize and may also reduce the amount of mail data you will move to Exchange Online. Free Reporting Tool: Cayosoft Administrator Report AD Users Inactive
In the Cayosoft Administrator Console:
New Report > AD Users Inactive
Cleanup Invalid Directory Data
Just because a user account allows the user to sign-on to Active Directory (AD), that doesn’t mean the account details don’t contain hidden problems. On-premises AD may allow characters or string lengths that are not valid in Office 365. There are free tools available to help correct these issues including Cayosoft Administrator and some from Microsoft.
Align UserPrincipalNames (UPNs)
Microsoft recommends that each user’s Active Directory UserPrincipalName (UPN) match the user’s Office 365/AD sign-in name. Many organizations have placeholder suffixes such as .local or .corp which can’t be used with Office 365. After you have registered a domain name in Office 365, you can add the same domain name to Active Directory through the Active Directory Domains and Trusts (ADDT) utility. After the domain name is registered ADDT it can be selected on the the user property page in Active Diretory Users and Computers allowing you to match the AD user’s UPN with their Office 365 Sign-in. Cayosoft Administrator’s AD Users | Find & Replace UserPrincipalName (UPN) Suffix rule can do this find/replace for you for free.
In the Cayosoft Administrator Console:
New Rule > Microsoft Hybrid and License Management > Directory Synchronization Prep > AD Users Find & Replace UserPrincipalName (UPN) Suffix
Register a Managed Domain Name in Office 365
When you first sign-up for Office 365 you are asked to provide a unique prefix to the standard Microsoft domain which is onmicrosoft.com. So most customers end up with something like mydomain.onmicrosoft.com as the suffix for their user account sign-on names. If you own a domain name, you can register it with Office 365 making it a “Managed Domain”. This turns your sing-in names from jamessmith@mydomain.onmicrosoft.com to the much simpler jamessmith@mydomain.com. This is an important step because it has an impact on how your existing Active Directory accounts are match up to their new Office 365 account counterpart.
In the Office 365 Portal:
Admin > Settings > Domains > [+Add domain]
Configure DNS (Domain Name Services)
Mail delivery is probably already working for you. You will need ot add DNS records for various Office 365 services such as Online Exchange, Skype, Mobile Devices Management, etc… The Microsoft Office 365 Portal has an excellent utility that will guide you through adding the correct records.
In the Office 365 Portal:
Admin > Settings > Domains > Select domain > DNS Management
Exchange AutoDiscover
Exchange AutoDiscover automatically configures Outlook client profiles so that you do not have to distribute server and other connection details to users. After a mailbox is moved from On-premises exchange to Online Exchange, AutoDiscover (if setup properly) will redirect the user’s client to the new Online Mailbox automatically. DNS plays an important role in the AutoDiscover process so making sure AutoDiscover works prior to the migration is a key step. Learn more here…
Install Directory Synchronization
According to Microsoft, “Azure AD Connect will integrate your on-premises directories with Azure Active Directory. This allows you to provide a common identity for your users for Office 365, Azure, and SaaS applications integrated with Azure AD. ”
To clarify, Azure AD Connect is a traditional state based synchronization tool that performs two basic tasks.
- Match on-premises Active Directory Users and Groups with their online counterparts.
- Synchronizes attributes from Active Directory on-premises User/Group to the online matched User or Group they are matched with in Azure AD.
Download Azure AD Connect here.
Verify Exchange Digital Certificates
For security reasons, connections to Exchange must be made using the SSL protocol. The default is for Exchange to use a self-signed certificate. Most admins will acquire an SSL certificate from a trusted provider and install that certificate for use with Exchange. To use Office365Migrator any certificate will work, but it is recommended that a trusted certificate must be used at all times and that the connection always be made using https:.
Learn more here.
Configure/Test Exchange Hybrid Mode
Hybrid mode configures the On-premises and Online Exchange for mailbox moves and for co-existence. Hybrid mode is required to use Office365Migrator and it gives your users a seamless experience as you move their mailboxes to Office 365. Other benefits include:
- Configures Mail flow between On-Premises and Online Exchange
- Provides a Unified Global Address List (Shared address book)
- Free/Busy Calendar Sharing between On-Premises and Online Exchange
- Unified Outlook Web App (OWA) access for users
- Move mailboxes between On-Premises and Online Exchange
In the Exchange Admin Center:
Hybrid > Enable
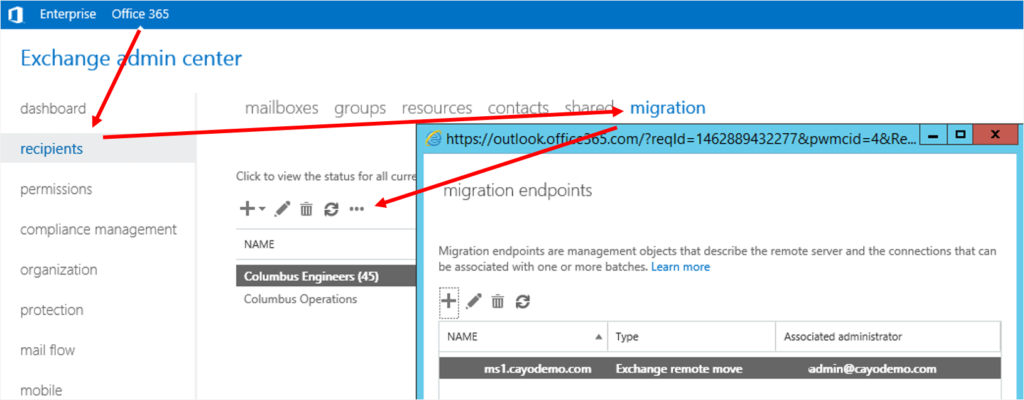
Configure/Test the Exchange Migration End-point
The Migration end-point allows Exchange Online to see the on-premise mailboxes and control the way in which and synchronization of mailboxes is performed.

In the Exchange Admin Center:
Office 365 > recipients > migration > […] > migration endpoints > [+]
Install & Configure Office365Migrator
On the server that will serve as your migration server, install the Office365Migrator setup package.
- From the start menu, choose more applications > Office365Migrator.
- Sign-in to the Office365Migrator application using an account that has local administrative permissions on the server where Office365Migrator is installed.
- Click Configuration in the navigation pane, bottom-left.
- In the Exchange Online configuration section:
Enter the username and password for an Office 365 Global Admin account. Note: This account should exist in Office 365 only and not be synchronized with Active Directory. - In the Exchange On-Premises configuration section:
- Enter the name of the Exchange Server that will serve as the server from which mailboxes will transit to Exchange Online.
- Enter the username and password of an Active Directory account that has both Active Directory and Exchange administration permissions
- Enter the External DNS name of Mailbox Replication Service that was defined during the configuration of Exchange Hybrid.
- In the E-mail routing settings section:
Enter the name of default domain name to be assigned to mailboxes migrated to Exchange Online.
